How to start a food blog - The ultimate step-by-step guide

There may come a point in your food adventures where you realize that it might be a great idea to start a food blog. But how? What are the steps? What are the pitfalls? Will I get famous? Will I be emotionally distraught by being a slave to technology? Here I’ll show you easy steps to start your own food blog.
It happened to me! The deeper I dug into food the more I had this nagging urge to dig even deeper. Eventually I learned that if I started jotting stuff down, I could put down a current food project and jump back in later when I got around to it and just pick up right where I left off. Pretty soon the documenting part of the note-taking became fun and not as daunting. After years of almost flunking out of creative writing classes, it was now fun to just scribble down my thoughts on my journeys with food. How did that happen? I wish I would've discovered this in high school!
The deeper I dug into food the more I had this nagging urge to dig even deeper. Eventually I learned that if I started jotting stuff down, I could put down a current food project and jump back in later when I got around to it and just pick up right where I left off.
Who cares if people pay attention to what I’m writing? But it could be worth it if even just one person out there got something insightful from my rambling. What if I started a food blog? Would it be something that I’d be really into and put down shortly thereafter or would I feel compelled to polish it year after year as I explored how deep this rabbit hole goes? There was only one way to find out.
Starting your food blog your way
There’s a lot of different ways to run a food blog and I’m by no means proclaiming that I know the one, true way. However, over the years I’ve learned how to do it in a way that works best for me. I jokingly refer to this as the Mattie way. This guide will focus on what’s worked for me, with other tips that should improve your overall understanding of what kind of options you have.
When you start your food blog, you’ll have almost too many choices in regards to the technology you have available to you. That’s because we live in the future! You’ll have the choice of using a pre-built system that’ll give you limited possibilities, or building much of your own system that has almost unlimited possibilities.
How websites work, in a nutshell
Modern websites, including food blogs, are usually database driven, meaning they utilize a software application that runs on a server. When someone goes to a website, the software application tells a bunch of files how to interact with a database so the proper content gets delivered over the internet to the viewer’s web browser. Think of it as a library. Remember those? When you request a book about foreign policy at the counter, the librarian would go to the card catalog, which tells her where the book is located. She then goes and retrieves the book for you. In this case the card catalog is the database and the book is the files.
These software applications have a special url for the person running the website to log into so they can access the controls of the website. This is known as the admin interface. Some tech-nerds, such as myself, also refer to this as the back end. The website where the readers go to is referred to as the front end.
For example, most users who use Bill’s website go to www.billswebsite.com. When Bill works on his website, he goes to the admin interface at www.billswebsite.com/administrator. There, he’s able to write his articles and adjust the way the site looks and performs.
Back in the early days of the internet, people built websites with a bunch of files containing html code, with no database needed. These are known as static websites. Who wants to write all that html code? Ugh! Who has time for that drama? I just want to bake and write. Almost all websites today are database driven, which means that, depending on the type of website we run, we might not need to write any code ever. Yesss! I’m so glad I live in the future!
The two different types of blogs
To help you drill down and decide how to create your food blog, understand that there are two different types of blogs:
- A pre-built blogging platform that’s managed by a company.
- A build-it-yourself blogging platform that’s managed by mainly you.
The pre-built food blogging platform
Think of the pre-built version of your food blog being a plant planted in a small pot. In this case the plant will grow really well early on with minimal maintenance. But if and when it gets too big for the pot, its growth and overall well-being will be compromised. You could be stuck!
Examples of popular pre-built blogging platforms are:
TIP: Notice the .com here that Joomla and WordPress use. This is their marketing teams wanting you to know this is their product that is pre-built as opposed to build-it-yourself. There are more platforms that fit the examples above but for the purposes of starting a food blog, the above platforms are what I recommend.
Benefits of pre-built blogging platforms are:
- Easy to start
- Easy to maintain; you aren’t weighed down by optimizing and upgrading so you can focus on creating content.
- Reliability. If your food blog goes down at all, it’ll be so rare you probably won’t even notice it.
Drawbacks of pre-built blogging platforms are:
- You can’t “open the hood” and make changes. It’s a cookie cutter world. Did you wake up in the middle of the night last night with a breakthrough idea that could revolutionize your food blog? You might not be able to do it! You might have to wait around until your blogging software company gets around to implementing the functionality, if they ever do.
- Want to monetize your blog? Even if you’re allowed to run ads at all on your blogging platform, you’ll have extremely limited control over where you place them.
The build-it-yourself food blogging platform
Think of the build-it-yourself version of your food blog being a plant planted in a field next to a stream. Getting the plant off to a good start is going to be much harder because it’ll involve some extra love and care on your part. You might have to enroll in Gardening 101. But once that plant gets its roots developed, it’ll have the capability of growing into a beautiful tree; the sky is literally the limit!
Examples of popular build-it-yourself food blogging platforms are:
TIP: Notice the .org here that Joomla and WordPress use. This is their marketing teams wanting you to know this is their product that is build-it-yourself as opposed to pre-built. There are more platforms that fit the above examples but for the purposes of starting a food blog, the above platforms are what I recommend.
Benefits to build-it yourself blogging platforms are:
- Because you own the entire platform, you have complete control over an almost infinite amount of things such as:
- Precise content layout so you can tailor your food blog exactly to your audience
- Search engine optimization, (also known as SEO) so more people find your food blog
- Traffic analytics so you can streamline how your food blog gets to your readers
- Monetization strategies such as ads so you can offset your costs and maybe even make a few bucks!
- Remember when you woke up in the middle of the night last night with that crazy breakthrough idea? If you really want to, you can implement it by the morning!
- More bang for the buck. The cost of running a publication that you have complete control over that has an international reach is more affordable than its ever been. This is because we live in the future!
Drawbacks of build-it-yourself blogging platforms are:
- Very steep learning curve. You’ll definitely want to have an open mind and an iron resolve when it comes to learning the ropes. Think “student always”. Like learning crossword puzzles? Good because this is your new crossword puzzle. Embrace it. You’ll have to want to curl up with your blogging software platform and a cup of hot cocoa on a cold Winter’s night. You’ll find that it’s totally normal to have a love/hate relationship with your blogging software. You might cry. I did! Chin up kid; the hidden benefit is that if you stick with it, you’ll come out ahead!
- You’ll need to remember to upgrade your food blog software platform as updates become available. This ensures that everything works as reliably and securely as possible. If you forget to upgrade your food blog for a couple years, it could be a major hassle to bring it up to date without something scary happening.
- You’ll need to figure out a way to back up your food blog so if something goes haywire you don’t lose all of your hard work. Hint: two separate backup plans.
How to choose your blogging platform
The takeaway here is that your choice of which type of food blogging software you should use is largely based on your DNA. Are you the type of person who likes to push a button and have something just work? Or are you someone who isn’t afraid to spend a little extra time tweaking and adjusting something until it’s just perfect?
Put more succinctly, do you want to make your brownies from a box mix or would you like to know exactly how your brownie recipe works, then spend days, weeks or even months perfecting them so you can make the best brownies you possibly can?
If you’re a box mix brownie baker, consider a pre-built food blogging platform.
If you’re a from-scratch brownie baker who bakes outside the lines, consider a build-it-yourself food blogging platform.
Pre-built blogging platforms
Of the pre-built blogging platforms, Joomla.com and WordPress.com have the most flexibility in regards to customization. You’ll be able to pick out the widest variety of visual layout themes and even be able to install a limited amount of plugins made available that can extend functionality.
Google Blogger, Squarespace and Tumblr have extremely limited functionality in terms of customization. I don’t recommend them at all unless you’re just writing for yourself, and even then, why not just use Google Docs? You’re putting enough work into your food projects. Why not go the extra mile and showcase your work on a robust and beautiful blogging platform? You owe it to yourself!
Of the pre-built blogging platforms, I recommend Joomla.com. This is because Joomla.com is a scaled down version of the Joomla.org build-it-yourself platform. This gives you the option of being able to upgrade from Joomla.com to fully-featured Joomla.org if your blog grows. This is a really big deal. That means you can have the convenience of starting small and the ability to scale up to a more robust platform if the need arises.
As of this writing, WordPress.com doesn’t have the ability to be upgraded to the more fully featured WordPress.org. This is because the code that runs both platforms is not compatible. This means that if you build your food blog on WordPress.com and you later realize that you really intended to be a food blogging ninja, you won’t have an easy upgrade path as you migrate to a more robust blogging platform.
Build-it-yourself blogging platforms - Content Management Systems (CMS)
I have a confession to make: Build-it-yourself blogging platforms are actually called content management systems, or abbreviated as CMS. I wanted to make things simple so I referred to them in this way until now.
They’re called content management systems in the web industry because they do exactly that; they’re systems that manage content. From here on out, I’ll be referring to build-it-yourself blogging platforms as CMSs. A CMS can run any type of website you choose. Most of the websites you go to on a daily basis are run on CMSs, consisting of either WordPress.org, Joomla.org or a variety of other products.
The CMSs I recommend for food blogging are Joomla.org and WordPress.org. At this point, it’s kind of like religion. Any platform I recommend can and will be protested by the 8,523,000 fans of that particular platform.
Why I chose Joomla.org for Veganbaking.net
Back in 2007 when I started building Veganbaking.net, WordPress.org looked immature in my opinion. You could tell which sites were WordPress.org sites because most of them looked like regular blogs. At the time, I wanted a platform that would enable me to be as unconstrained as possible in terms of site design, but still be relatively easy to use. I felt that Joomla.org had a slightly steeper learning curve but had the flexibility to do more. As of this writing, the scene is much different.
Currently, WordPress.org sites have the most market share in the CMS world as well as a huge fan base. This CMS now powers a surprisingly large percentage of websites on the internet. It’s no longer possible to tell that a site is a WordPress.org site because this CMS has matured considerably.
The Joomla.org user base has grown a small amount but not as much as WordPress.org. At this point, both CMS platforms are so close in terms of capability that, as I mentioned before, it’s like debating religion. If I were to start a food blog all over again, I’d personally use Joomla.org because I know it extremely well. I know it well enough that I can wholeheartedly recommend it as a robust food blogging platform. Are you more familiar with Wordpress.org? Great, you might want to stick with that as your platform of choice.
In my opinion, any food blogger that’s interested in a CMS would do as well on Joomla.org as they would on WordPress.org.
How to choose the best web host for your food blog
Where's this whole shebang going to live? There’s an overwhelmingly large selection of web hosts on the internet. There’s so much selection it actually hurts!
What’s the purpose of a web host? They house the physical servers that run your blog. Your web host runs a tight ship so your blogging software has the resources it needs in order to prosper.
As you look at web hosting options, you’ll notice a trend. Some web hosts can afford to host websites for $4 per month. Others will charge, say, $15 per month for a similar web hosting plan. What’s up with that?! Obviously the $4 web host is the better deal, right? Well, you get what you pay for. Here’s what’s actually happening:
Think of the $4 web host as a business facilitating the use of widgets. They have an extremely limited amount of widgets, and everyone who buys them doesn’t know they’re sharing. If too many people are using the widget at the same time, the widget starts to fail. No problem. Why not contact their technical support? But wait: remember that they don’t own the widgets, they’re just facilitating the use of the widgets. This business just licenses the widgets from another company and resells them at a profit. What?! Yes. The web hosts that sell web hosting for $4 per month are crowding so many people on the web servers that they don’t even own, that if you ever have an issue, you’re completely out of luck. They have to call the company that actually houses the servers in order to get them fixed. Guess how well that’s going to go?
In contrast, the company charging $15 per month for their hosting plan usually owns the servers in-house and pays the technicians who maintain them directly. Have a problem with your website? If you call or email them, they’ll actually be responsive in resolving your issue and they’ll actually have access to the physical web server. When running a food blog that you’re passionate about, this is priceless!
I can’t tell you how many times I’ve contacted my web host and had them resolve an issue for me. They’re on your side. $15 per month is not a lot to ask for, for peace of mind.
Another benefit of having a great web host that runs their own servers is that when you need to scale up your web hosting, they’re available to assist you with the best options. I’d hesitate to have the $4 web host scale up my food blog plans, when they don’t even house my web server!
Right now I’m paying about $250 per month on web hosting. I’ve been able to easily grow with my current web host.
The food blog web host I recommend
After spending several years working with several web hosts, I now wholeheartedly recommend Liquidweb. This is due to several factors:
- Their pricing plan is well below what most web hosts offer for the same performance.
- Their support is top-notch. I don’t even need to call them when I have a question or technical issue because when I email them, I get a response in less than an hour. Who calls people nowadays anyway? Aren’t we in the future?
- Since the web hosting service is managed (more on that below), if I have an issue with web server performance, they’ll be able to tell me what’s causing it and easily resolve it in most cases. They have a wide selection of super-robust hosting options. As my food blog grows, they have the options that best fit my needs at an affordable price, as well as the technical expertise to guide me to the best option.
I’ve been with several web hosts over the years that don’t fulfill these criteria. I left my last web host because they told me that they were going to have to deactivate my website because it was taking too many resources from their web server. When I asked if they could help, the said they couldn’t do anything because my hosting plan was unmanaged. Unmanaged means that they basically don’t care what happens to your web server. You’re on your own! At the time, this web host didn't offer managed web hosting plans. I was screwed!
With Liquidweb, I utilize their managed web hosting option where they constantly monitor and oversee the performance of the web server that I use. This is for the same price as my last web hosting service. They’re able to offer this service considerably cheaper than the competition. Sometimes as soon as I notice a problem and contact them, they’re already working on fixing it and they send me an email shortly thereafter explaining what the issue was. They’ve got your back!
TIP: Other web hosting companies offer similar web hosting plans with unmanaged service for the same price as Liquidweb’s managed service.
For the beginning food blogger, I recommend Liquidweb’s Standard Web Hosting service which is $15 per month. This is more than those dreaded $4 per month plans but it’s significantly more robust. It’s an unmanaged plan, but if there’s an issue, they should at least be able to give you some insight if you’re having a web host-related problem. As your food blog grows you can upgrade to more robust hosting services with them with zero downtime.
The steps to starting a food blog
The great thing about starting a food blog now is that the process is now so streamlined and easy. The first thing you need to do is to choose your web host. If you don’t have a domain name yet, you’ll be able to sign up for one during the same time you sign up for your web host. They’ll take care of everything in one fell swoop!
After you’ve signed up with your web host, you’ll get a confirmation email with all of the critical details. Save this information under lock and key! When you need to access it, you’ll really need it. Not having it will not be an option (but you can reset your password by contacting your web host if you're desparate).
Once you get your email confirmation, you'll then proceed with creating the Joomla.org or WordPress.org installation on your new webserver. Then you're done! So in summary, starting a food blog consists of the following two steps:
Once you get your email confirmation, you'll then proceed with creating the Joomla.org or WordPress.org installation on your new webserver. Then you're done! So in summary, starting a food blog consists of the following two steps:
- Sign up for your web hosting plan
- Install your blogging software on your web server
How to sign up for a web host
Here's how to purchase web hosting from the web host I recommend, Liquidweb.
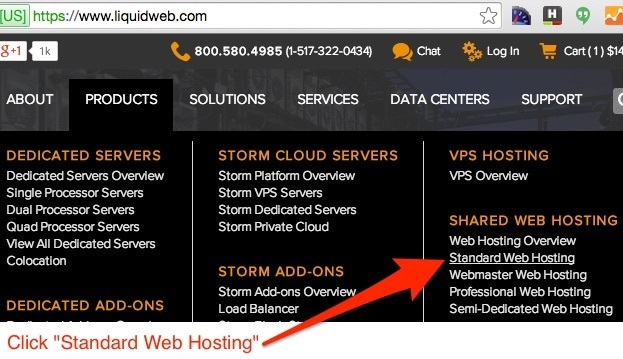
1) Go to Liquidweb. Click on Products then Standard Web Hosting.
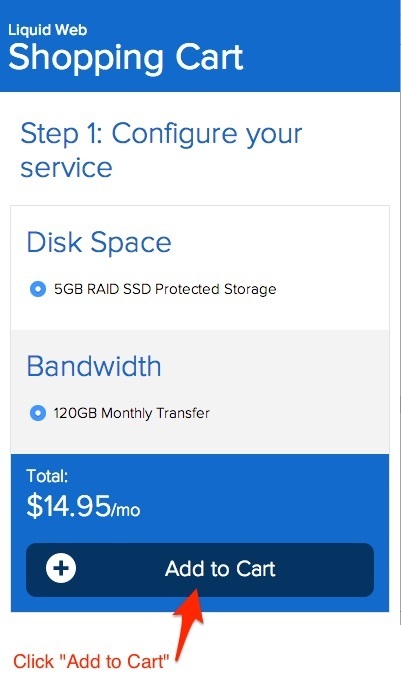
2) Click "Add to Cart" to add their Standard $15 per month web hosting service to your shopping cart.
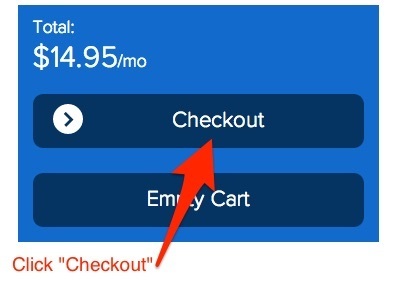
3) Click "Checkout" to proceed to payment.
4) Enter your contact and billing information, followed by your credit card information. If you haven't registered a url for your food blog yet, this is the best place to take care of it. Enter your desired password and click "Submit Your Order".

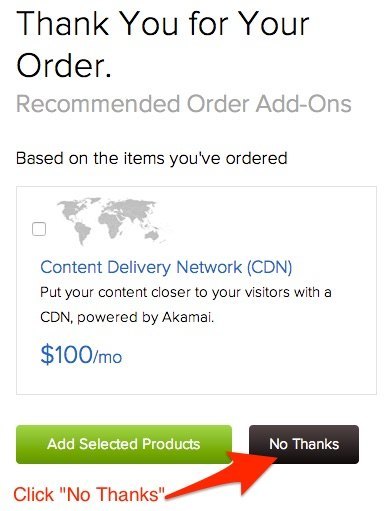
5) You did it! Congratulations! Click "No Thanks" to the current offer below if prompted. You'll get a confirmation email in your inbox momentarily with all your Liquidweb hosting details.

2) Click "Add to Cart" to add their Standard $15 per month web hosting service to your shopping cart.

3) Click "Checkout" to proceed to payment.

4) Enter your contact and billing information, followed by your credit card information. If you haven't registered a url for your food blog yet, this is the best place to take care of it. Enter your desired password and click "Submit Your Order".

5) You did it! Congratulations! Click "No Thanks" to the current offer below if prompted. You'll get a confirmation email in your inbox momentarily with all your Liquidweb hosting details.

How to start a food blog with Joomla.org
Here’s how to set up a food blog with Joomla.org
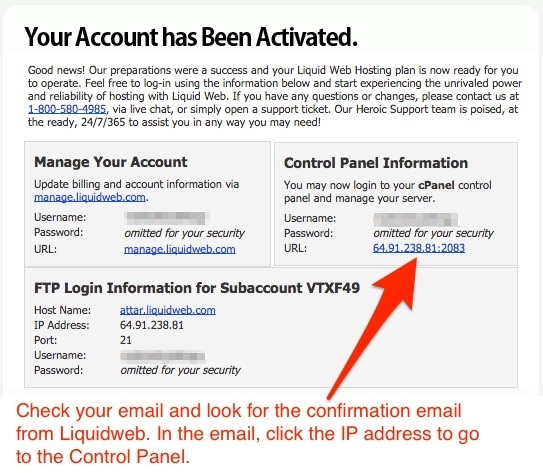
1) Check your inbox for the confirmation email from Liquidweb. Under "Control Panel Information" click the IP address to go to your Control Panel.
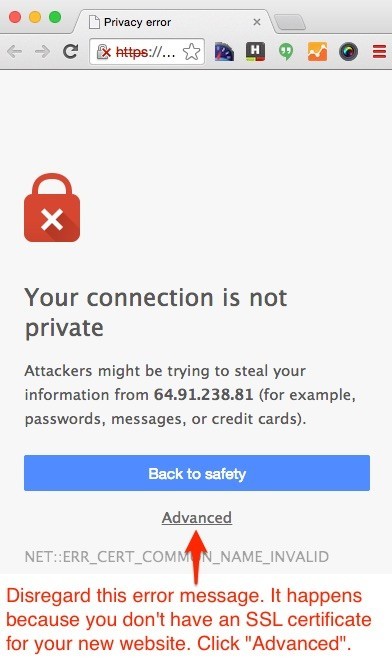
2) Since we're navigating to a new webserver intance without an SSL certificate, you'll get the error message below. Don't worry! Disregard the message by clicking "Advanced".
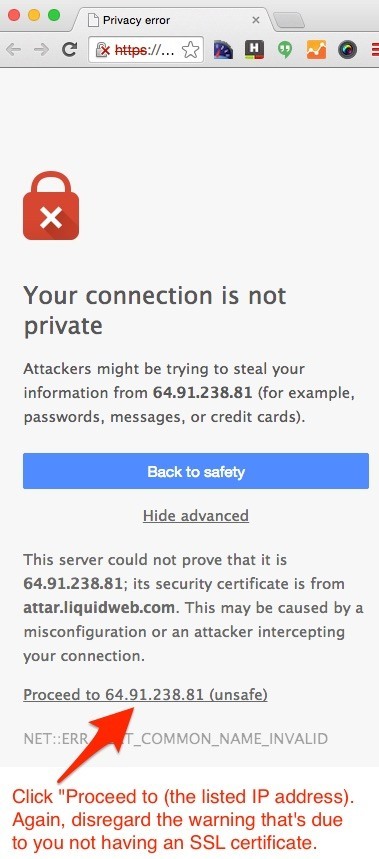
3) Now click "Proceed to (the listed IP address)" to continue to your Control Panel.
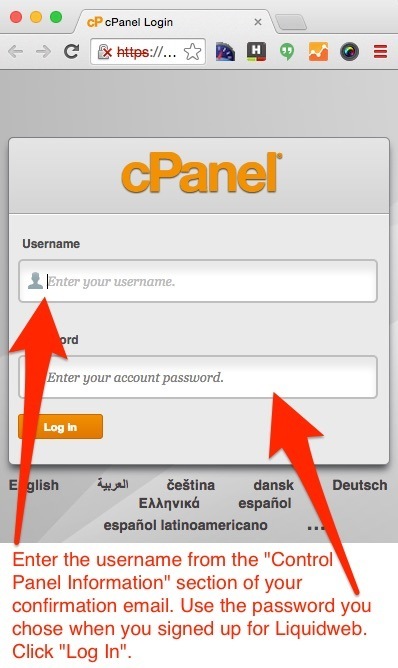
4) Log in with the username from the "Control Panel Information" section of your confirmation email. Use the password you used when you signed up for Liquidweb.
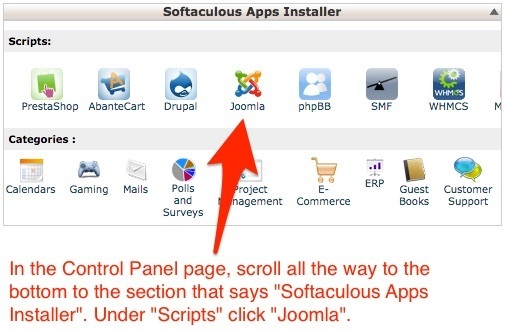
5) You're now in the Control Panel. Scroll to the bottom of the page to the section that says "Softaculous Apps Installer". Softaculous is a system that easily installs software on web servers. Locate "Joomla" and click on it.
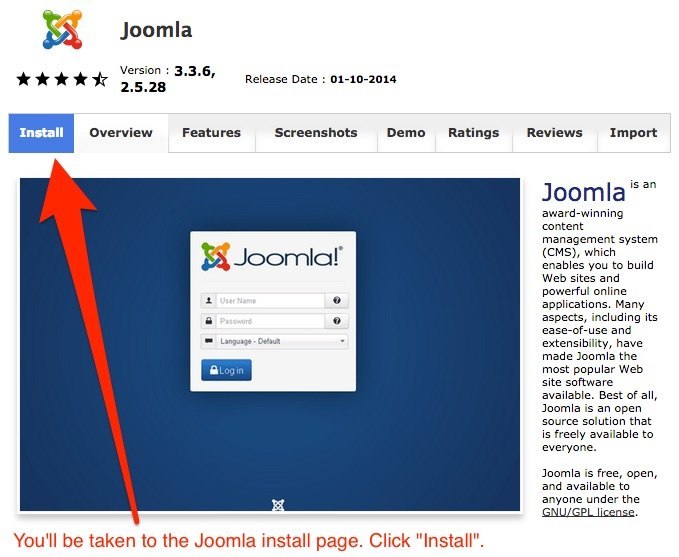
6) You're now at the Joomla install page. Click Install.
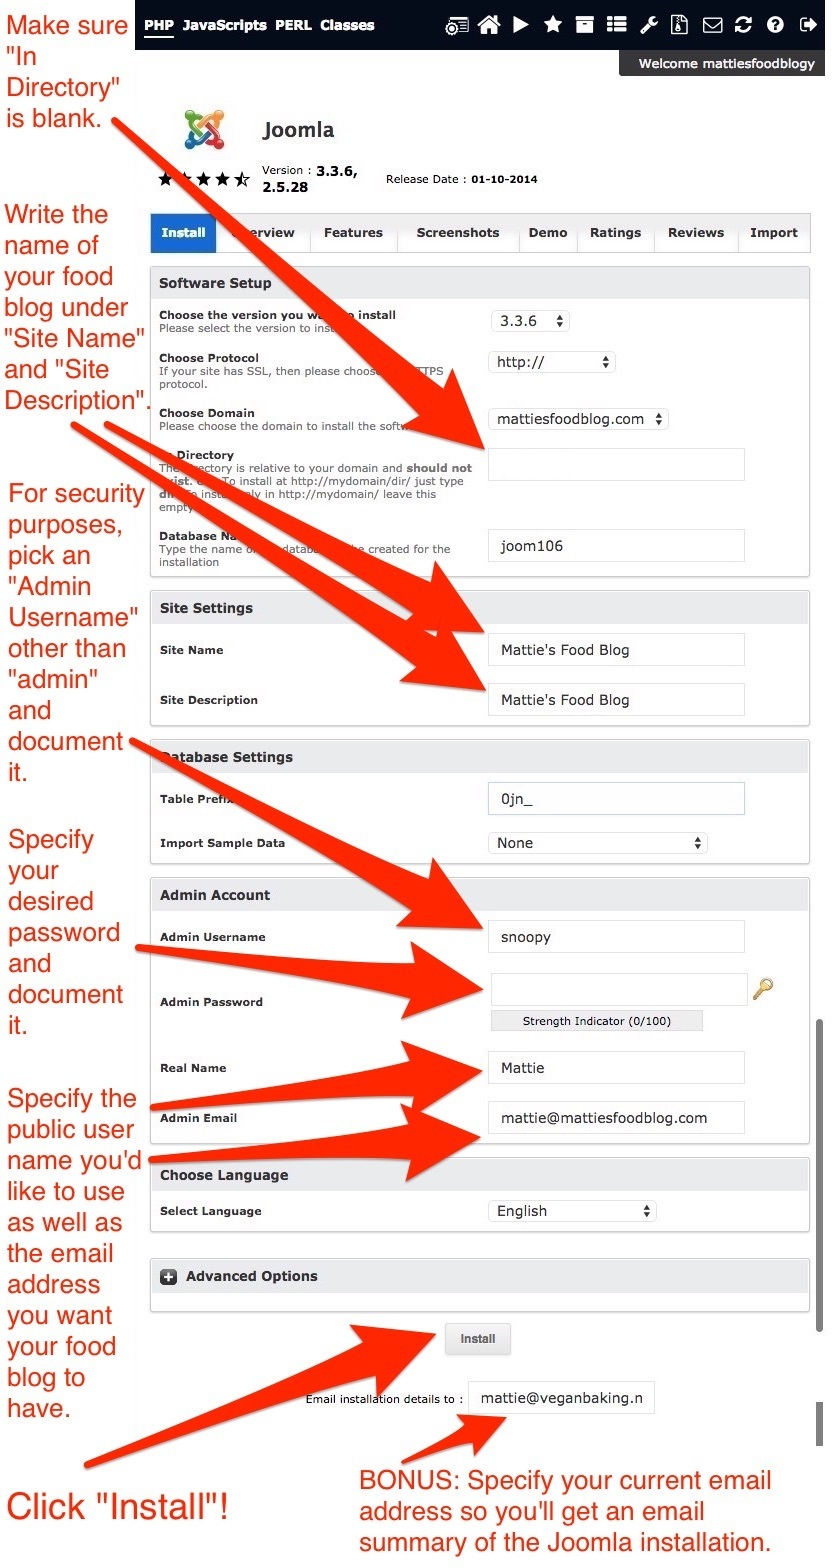
7) This next part is more simple than it looks! Make sure "In Directory" is blank so Joomla installs into the main root directory. When you're done, click Install. You're almost there!
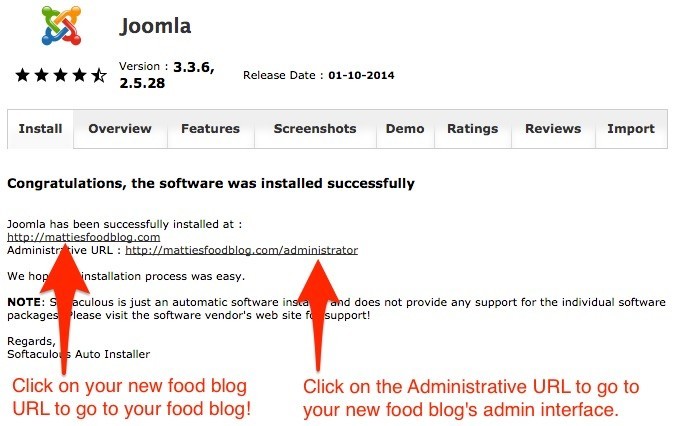
8) Congratulations! I knew you could do it. Note your new food blog url, as well as the Administrative URL. Click on each to open them in new browser tabs.
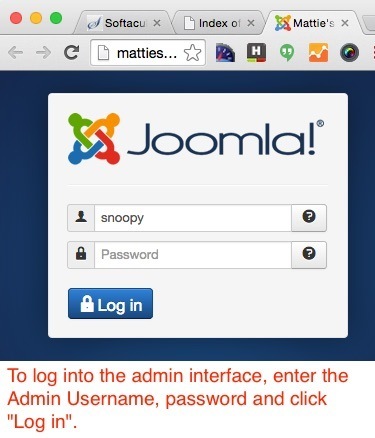
9) To log into your Joomla food blog's admin interface, enter the login credentials you specified in Step 7 and click "Log in".
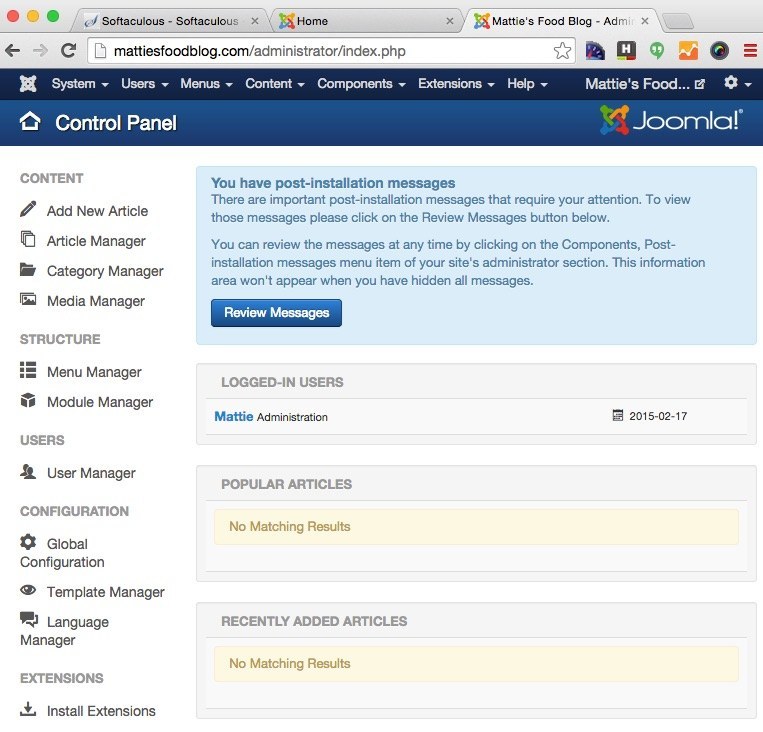
10) Now you're in the Joomla admin interface. This is where you configure your food blog layout and post all of your articles.
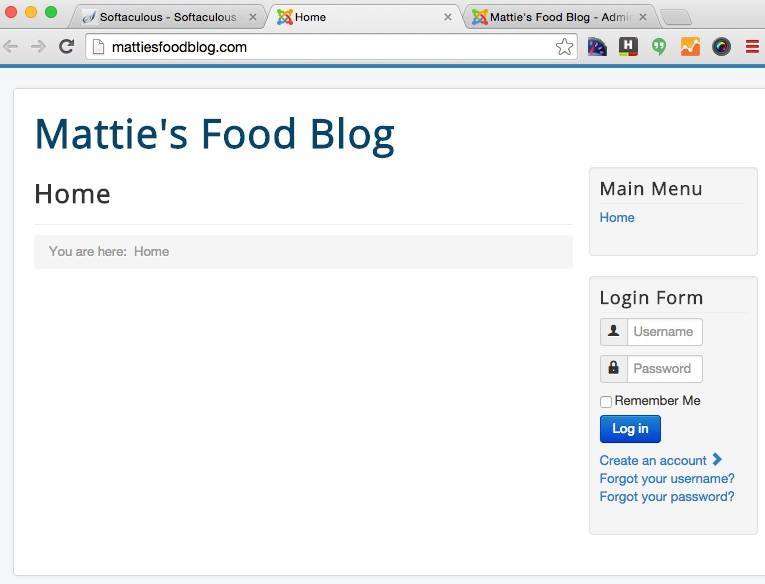
11) Go to your food blog's url and you'll be taken to your new food blog! You did it! Now you're ready to show the world what's going on in your kitchen.

2) Since we're navigating to a new webserver intance without an SSL certificate, you'll get the error message below. Don't worry! Disregard the message by clicking "Advanced".

3) Now click "Proceed to (the listed IP address)" to continue to your Control Panel.

4) Log in with the username from the "Control Panel Information" section of your confirmation email. Use the password you used when you signed up for Liquidweb.

5) You're now in the Control Panel. Scroll to the bottom of the page to the section that says "Softaculous Apps Installer". Softaculous is a system that easily installs software on web servers. Locate "Joomla" and click on it.

6) You're now at the Joomla install page. Click Install.

7) This next part is more simple than it looks! Make sure "In Directory" is blank so Joomla installs into the main root directory. When you're done, click Install. You're almost there!

8) Congratulations! I knew you could do it. Note your new food blog url, as well as the Administrative URL. Click on each to open them in new browser tabs.

9) To log into your Joomla food blog's admin interface, enter the login credentials you specified in Step 7 and click "Log in".

10) Now you're in the Joomla admin interface. This is where you configure your food blog layout and post all of your articles.

11) Go to your food blog's url and you'll be taken to your new food blog! You did it! Now you're ready to show the world what's going on in your kitchen.

How to start a food blog with WordPress.org
Here's how to set up a food blog with WordPress.org. It's almost exactly the same as setting up Joomla.org, except there are a couple different options on the install configuration page.
1) Follow the above How to start a food blog with Joomla.org through Step 4. This will get you to the Control Panel interface on your web server.
2) Scroll to the bottom of the page until you see the section that says "Softaculous Apps Installer". Softaculous allows you to easily install software on your web server with just a few clicks. Locate "WordPress" and click on it.
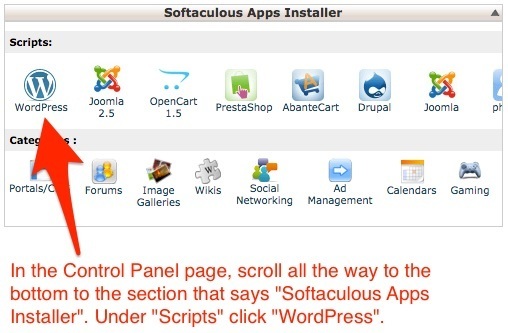
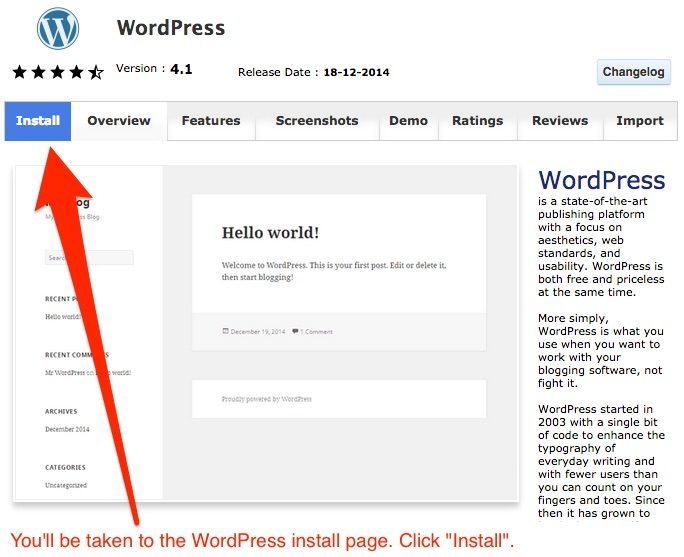
3) You're now at the WordPress install page. Click Install.
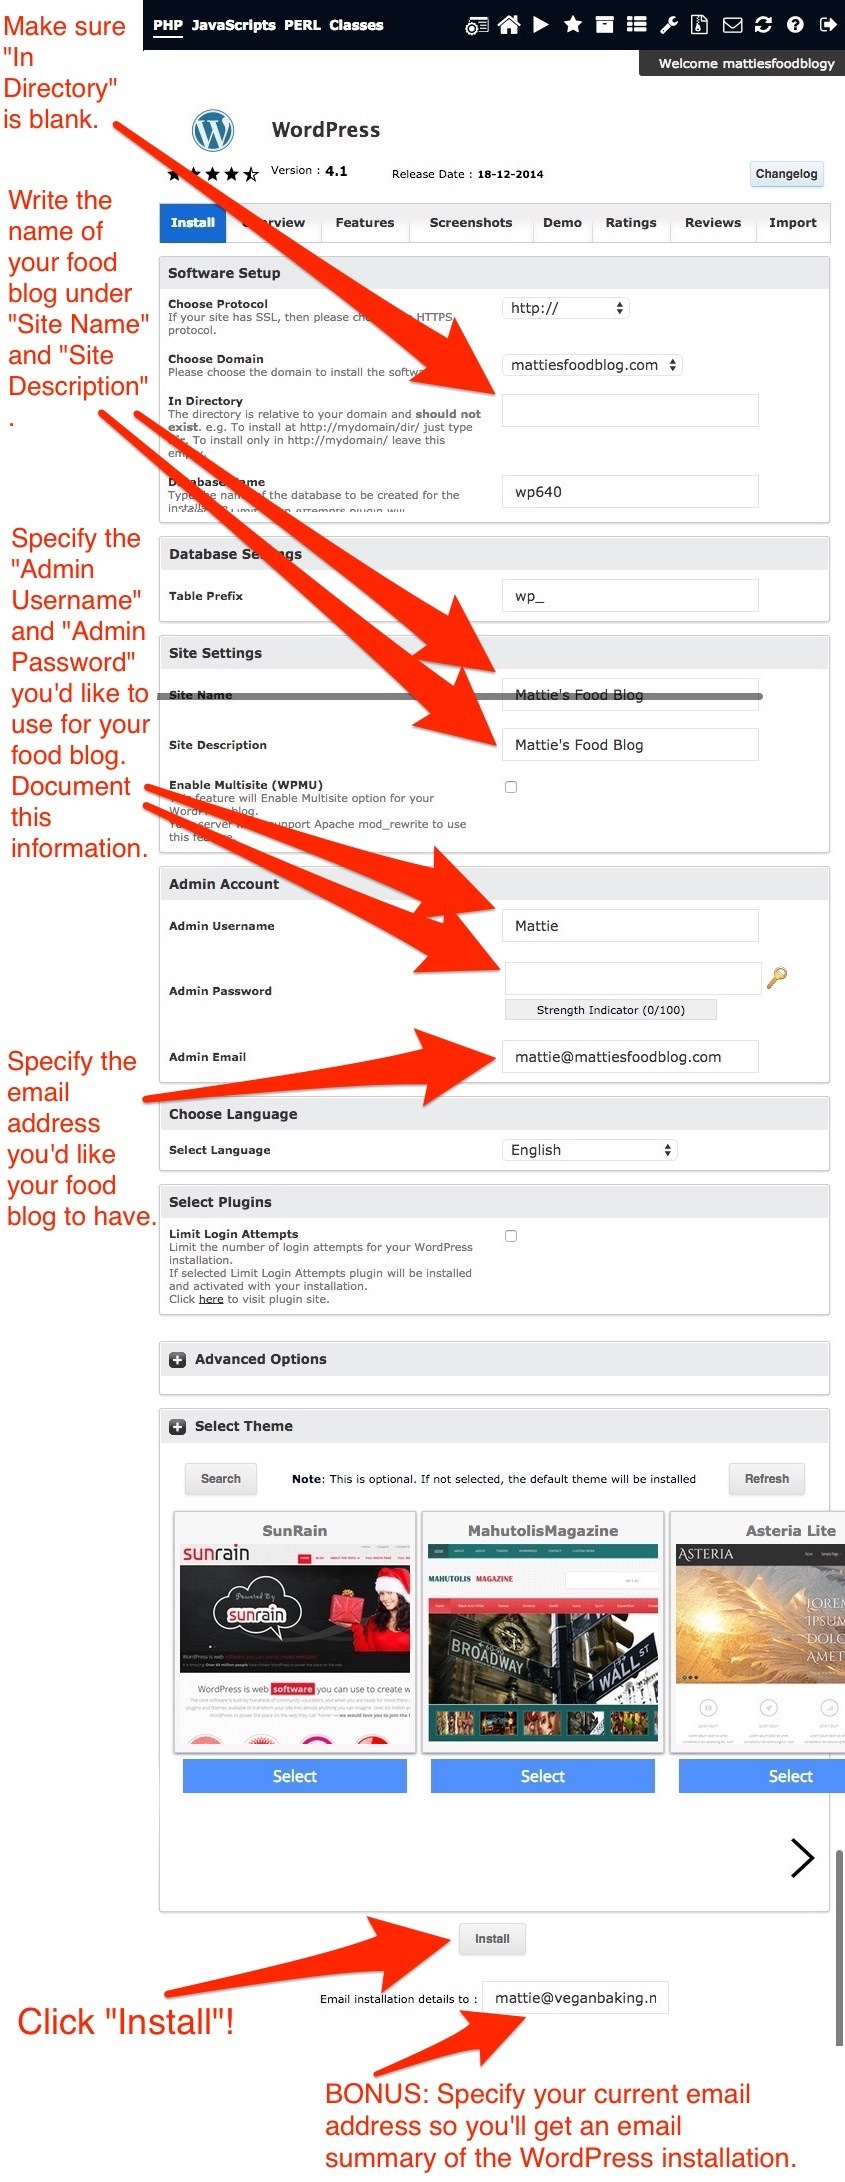
4) Don't worry, this part is much more simple than it looks! Make sure "In Directory" is blank so WordPress installs into the main root directory. When you're done, click Install. You're almost there!
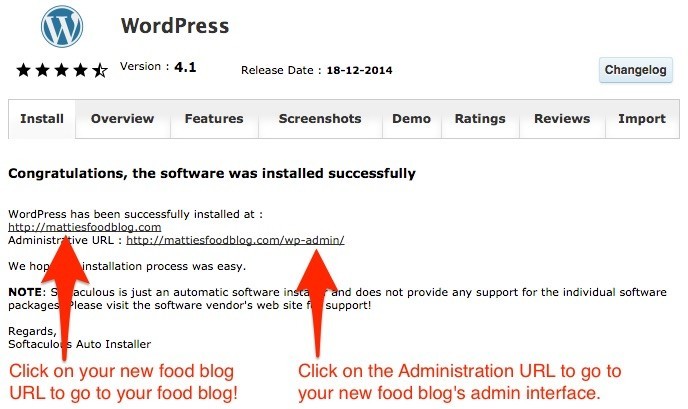
5) You did it! Give yourself a pat on the back. Note your new food blog url, as well as the Administrative URL. Click on each to open them in new browser tabs.
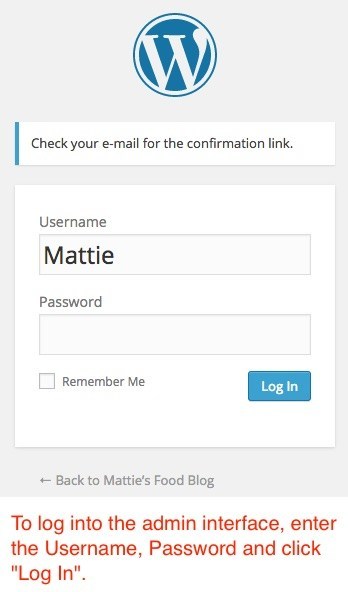
6) To log into your WordPress food blog's admin interface, enter the login credentials you specified in Step 4 and click "Log in".
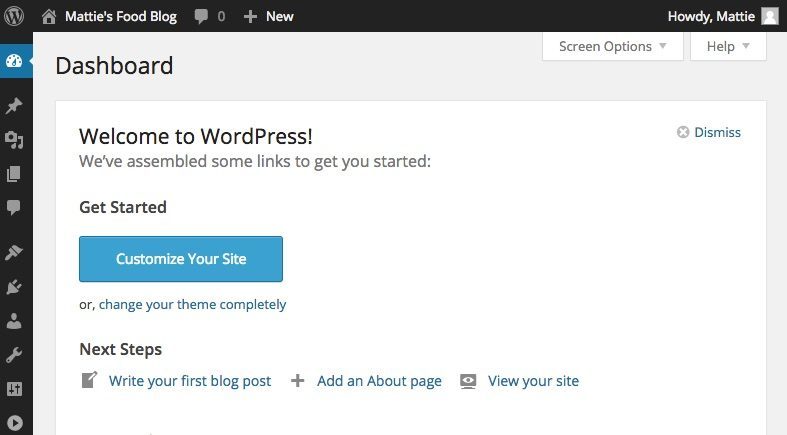
7) Now you're in the WordPress admin interface. This is where you post your articles and configure your food blog layout.
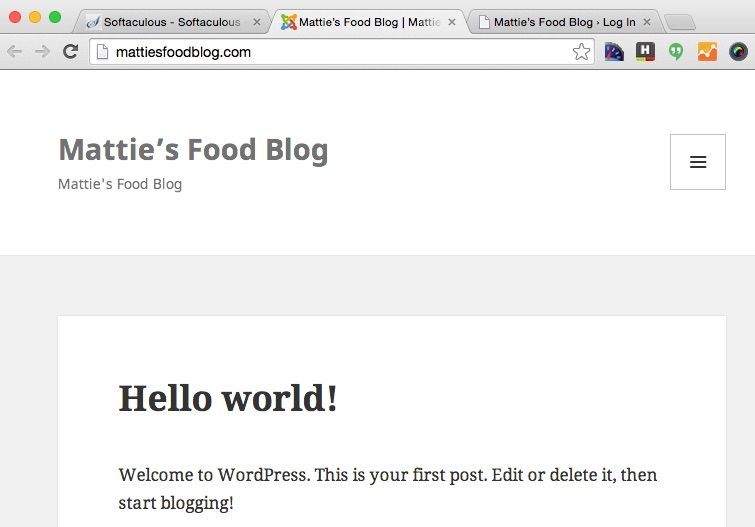
8) Now go to your food blog's url and you'll be taken to your new food blog! See? That wasn't so bad was it? Now you can finally share your new food adventures with the world.
1) Follow the above How to start a food blog with Joomla.org through Step 4. This will get you to the Control Panel interface on your web server.
2) Scroll to the bottom of the page until you see the section that says "Softaculous Apps Installer". Softaculous allows you to easily install software on your web server with just a few clicks. Locate "WordPress" and click on it.

3) You're now at the WordPress install page. Click Install.

4) Don't worry, this part is much more simple than it looks! Make sure "In Directory" is blank so WordPress installs into the main root directory. When you're done, click Install. You're almost there!

5) You did it! Give yourself a pat on the back. Note your new food blog url, as well as the Administrative URL. Click on each to open them in new browser tabs.

6) To log into your WordPress food blog's admin interface, enter the login credentials you specified in Step 4 and click "Log in".

7) Now you're in the WordPress admin interface. This is where you post your articles and configure your food blog layout.

8) Now go to your food blog's url and you'll be taken to your new food blog! See? That wasn't so bad was it? Now you can finally share your new food adventures with the world.

Ok I started my food blog. How do I use this thing?
I thought you'd never ask! Getting to know your food blogging platform can be intimidating at first. Like any powerful new piece of technology, it takes a little time to become comfortable. I recommend this analogy to help you learn how to work with your new blog: In order to move furniture into a house, you need to have the rooms available first.
This simply means that in order to post content like recipes and guides, you first need to create an organizational structure of buckets the content will go into. Once you have these organizational areas, you then can create your content and configure your navigation menu to point to this content. Without the organizational structure, you won't have a spot to place your recipes; it's like trying to place a couch in a room when the house hasn't been built yet. I'll delve more into this in a future article. For now, just remember the key is to make your organizational structure first, and the actual content second.
Now you're well on your way to sharing your food projects on a global scale. You've chosen your ideal web host, blogging platform and installed it yourself. Congratulations on starting your own food blog!
