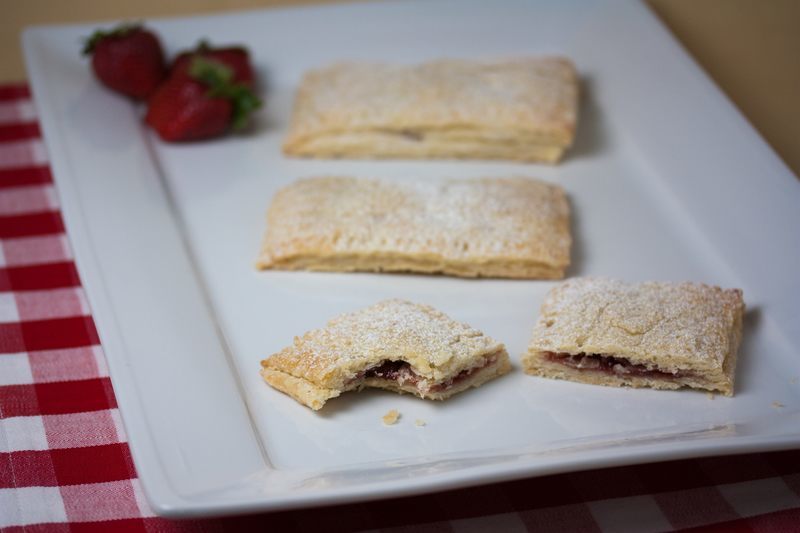
Vegan Strawberry Pop Tarts
4

Pop tarts are one of the easiest ways to pair fruit with flaky pastry goodness. This Vegan Strawberry Pop Tart recipe can be customized with whatever fruit preserves you have on hand. You can also fill them with things like chocolate; maple sugar and cinnamon; bananas and coconut, the possibilities are endless! Heck, you can even fill them with savory stuff like caramelized onions, mushrooms and potatoes. I won't judge. Just be sure to keep the filling under 2 teaspoons so they don't push out the sides during baking. The pastry is based on Flaky Vegan Pie Crust and features just the right ratio of Vegan Butter or margarine to shortening for the flakiest, most flavorful crust around.
These puppies are even custom made to fit into your toaster for easy heating directly from the freezer. What more could you ask for? Don't get discouraged by the vodka. It cooks off completely during baking. It's there so the crust will both be easier to work with and contain less water to result in more flakiness. If you really aren't able to use vodka then change the water content of this recipe to 6 to 8 Tablespoons total.
Find more Strawberry recipes on Veganbaking.net
Vegan Strawberry Pop Tart Recipe
2 ½ cups all-purpose flour2 Tablespoons sugar
1 teaspoon salt
¾ cup (161 grams) or 1 ½ sticks cold Regular Vegan Butter or non-hydrogenated stick margarine, cut into ¼ inch cubes
½ cup (108 grams) or 1 stick cold Vegan Shortening or store bought shortening, cut into 4 pieces
¼ cup cold water
¼ cup cold vodka
powdered sugar for dusting
1) Cut the Vegan Butter into the flour
In a large mixing bowl whisk together the flour, sugar and salt. Using a fork or pastry blender, cut the Vegan Butter and shortening into the flour until mixture resembles coarse sand. Take extra caution that you don't over mix.2) Add the water and build the dough
Drizzle half of the chilled water and vodka over the mixture then gently toss using your fingers. Drizzle the other half in and toss again. Now use a spatula to fold the dough over itself and press down to compress it. Do this a few more times until the dough starts to stick together. Do not over mix or the gluten will start to activate which will make the crust tough and mealy. The goal is to add just enough water to hold the dough together. If you add too much water, the crust will be firm instead of flaky.3) Chill the dough in your refrigerator to allow it to relax
Form the dough into a 4 inch disc, wrap in plastic wrap and chill in the freezer for at least one hour. This dough can be kept in the freezer for up to 6 months for later use. This step is important because it allows the gluten in the dough to relax which allows the dough to be soft, elastic and resist crumbling during forming.If you're working in extremely hot weather conditions, don't be afraid to put things in the freezer for a few minutes while you're working. The goal is to have a cool crust go into a hot oven so the crust 'pops' from the pockets of fat and water. This is what makes a flaky crust.
4) Use parchment paper to help you roll the dough flat
Cut two pieces of parchment paper to 12 x 12 inches. Rolls of parchment paper for home use are usually 12 inches long so you can use the box as a ruler. Unwrap one of the dough disks, place it on a sheet of parchment paper and cover it with the other sheet of parchment paper. Roll the dough out from the center until it goes out to the edges of the parchment paper. Carefully flip the dough over into a baking sheet. Remove the top layer of parchment paper.Don't worry if you have to patch the pie crust; this is normal. It's easily patched and repaired by lightly wetting each part to be joined with water then grafting on an extra piece of dough. Once it comes out of the oven, your repairs won't be too noticeable. When I work with pastry crusts I usually have a pastry brush and a glass of water on hand so I can easily wet the dough with the brush and patch it with pieces of leftover dough when necessary.
5) Cut the dough to size, add the preserves, seal and chill again
Using a pastry cutter or a dough separator cut the dough into a 9 x 10 inch rectangle. Now cut them into six 5 x 3 inch rectangles. Place 2 teaspoons of preserves in half of the dough rectangles. Work a water soaked pastry brush around the perimeter of each rectangle that contains preserves and then place each one's adjacent dough rectangle on top. Lightly press around the perimeter of each pop tart with your fingers to seal then press around the edges with the side of a fork to seal again. Poke a few holes in each tart with a toothpick to allow air to escape during baking. Freeze the pop tarts for anywhere between 2 hours and 6 months. If you choose to freeze them for more than a day, wrap them in plastic wrap.6) Bake to perfection
Preheat your oven to 375F (191C). Arrange the frozen pop tarts on a baking sheet lined with parchment paper and bake for 30 to 35 minutes, rotating the sheets halfway through the baking duration. It's normal for a little of the filling to leak out during baking. Allow to cool until warm, dust with powdered sugar and serve. May also be stored in the freezer, covered for up to six months.This recipe makes 6 Vegan Strawberry Pop Tarts.


